In this guide, we will walk you through the detailed steps of installing base layers for various types of construction, including the Dragon Bone System, Structural Panel Base Layers, Brick Concrete Structures, and Concrete Floor Installations. This guide is based on industry-standard installation methods and is intended to ensure that the base layers are stable, durable, and properly prepared for further surface finishing.
Dragon Bone System Installation
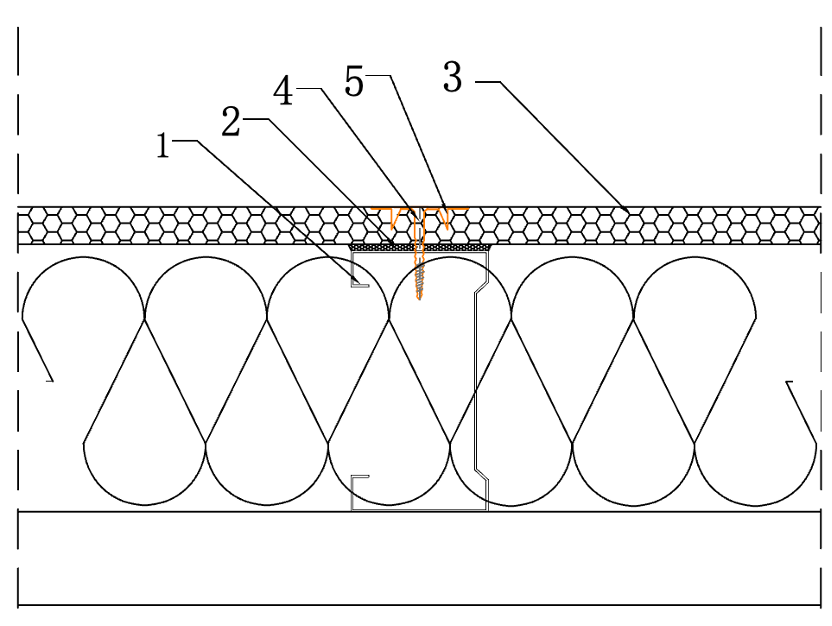
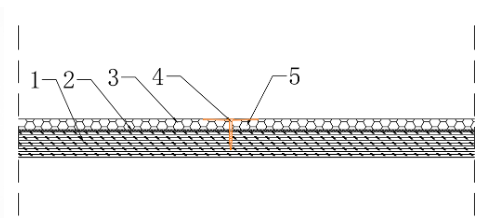
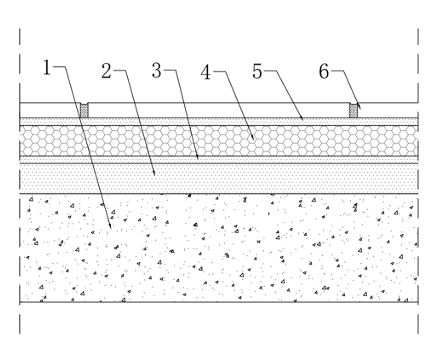
Dragon Bone Structure Process Section View
Key Components:
- Dragon bone
- A5 adhesive
- Board
- Self-tapping screws (purchased separately)
- Stainless steel claw washers
Notes:
- Suitable for light steel dragon bone, wooden dragon bone, aluminum alloy dragon bone, and other dragon bone structures.
- In the dragon bone framework structure, the minimum thickness of the board used is 12.5mm.
- Stainless steel claw washers should be no less than 5 per square meter, arranged in a staggered pattern.
- When installing the washers, they should be slightly recessed into the board surface, and the adhesive should be smoothed and level with the board.
Dragon Bone System Installation with 12mm Slats
Key Components:
- Tile adhesive
- Slat 12mm thickness
- A5 adhesive
- Board 12mm thickness, joint sealed with adhesive and overlapped on the slat.
- Brick and mortar base
- Tile adhesive
- Slat/board
- A5 adhesive
- Anchoring device
Notes:
- Suitable for installations on walls with a board thickness less than 30mm.
- In this structure, the minimum thickness of the board used is 12.5mm.
- Anchors should be no less than 5 per square meter, arranged in a staggered pattern.
- The anchor should extend at least 35mm into the load-bearing wall structure.
- When installing anchors, they should be slightly recessed into the board surface, and the adhesive should be smooth and level with the board.
- The anchor should be at least 30mm from the edge of the board.
Dragon Bone System Installation with 30mm Slats
Key Components:
- Tile adhesive
- Slat 30mm thickness
- A5 adhesive
- Board 30mm thickness, joint sealed with adhesive and overlapped on the slat.

- Brick and mortar base
- Mortar
- Slat/board
- Anchoring device
- A5 adhesive
- Plastic threaded nails
Notes:
- Suitable for installations on walls with a board thickness less than 30mm.
- In this structure, the minimum thickness of the board used is 30mm.
- Anchors should be no less than 5 per square meter, arranged in a staggered pattern.
- The anchor should extend at least 35mm into the load-bearing wall structure.
- Plastic threaded nails should be placed every 300mm.
- When installing anchors, they should be slightly recessed into the board surface, and the adhesive should be smooth and level with the board.
Dragon Bone System Installation Steps
STEP 1. Substrate Treatment
Clean the dragon bone surface, apply adhesive to bond the board substrate, and install the slats.
STEP 2. Tile Backer Board Installation
Fix the washers, plastic threaded nails, and anchoring devices. Joint treatment: apply adhesive to the joints, for wet areas, milling the joints and applying adhesive overlap (like in shower areas).
STEP 3. Gap Treatment and Finish Installation
Refer to ” Gap Treatment Process” for gap finishing.
Structural Board Substrate Installation
Wooden Structure Board Substrate

Key Components:
- OSB board
- A5 adhesive
- 6mm thick board, joint sealed with adhesive
- Mechanical reinforcement with screws and washers
- Wooden structure board
- A5 adhesive
- Board
- Self-tapping screws (purchased separately)
- 32mm stainless steel claw washers
Notes:
- Suitable for OSB, plywood, multi-layer boards, and other wooden structural boards.
- The board used in this structure should have a minimum thickness of 6mm (6mm boards are used without claw washers).
- Stainless steel claw washers should be no less than 5 per square meter, arranged in a staggered pattern.
- When installing washers, they should be slightly recessed into the board surface, and the adhesive should be smooth and level with the board.
Cement-based Structural Board Substrate
Key Components:
- Calcium silicate board
- Tile adhesive
- 6mm thick board, joint sealed with adhesive
- Mechanical reinforcement with screws and washers
- Calcium silicate board
- A5 adhesive
- Board
- Self-tapping screws (purchased separately)
- 32mm stainless steel claw washers
Notes:
- Suitable for calcium silicate boards, glass-magnesium boards, and other cement-based structural boards.
- The board used in this structure should have a minimum thickness of 6mm (6mm boards are used without claw washers).
- Stainless steel claw washers should be no less than 5 per square meter, arranged in a staggered pattern.
- When installing washers, they should be slightly recessed into the board surface, and the adhesive should be smooth and level with the board.
Structural Board Substrate Installation Steps
STEP 1. Substrate Treatment
Clean the substrate and apply adhesive (A5 or tile adhesive) to bond the board.
STEP 2. Tile Backer Board Installation
Mechanically reinforce with screws and washers, and seal joints with adhesive.
STEP 3. Gap Treatment and Finish Installation
Refer to “Gap Treatment Process” for gap finishing and surface installation.
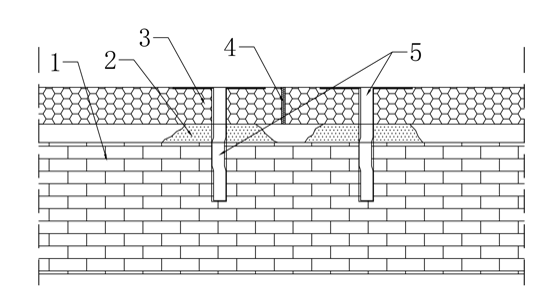
Brick and Mortar Wall Installation
(Suitable for Small Areas Such as Bathrooms; Large Areas Like Basements Recommend Slat Framework System)
Thin Paste Method, Error Margin Within 5mm
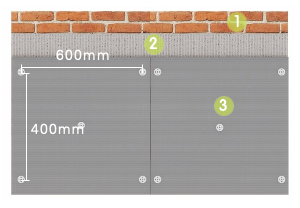
- Old wall renovation base (tile)
- Thin layer of tile adhesive
- 12mm thick board, joints sealed with adhesive.
- Masonry wall
- Tile adhesive
- Board
- A5 adhesive
- Anchor
Notes:
- Suitable for masonry or old wall renovation base, with a flatness error of 5mm or less.
- The board used in this structure should have a minimum thickness of 6mm.
- Anchors should be no less than 5 per square meter, arranged in a staggered pattern.
- Anchors should extend at least 35mm into the load-bearing wall structure.
- When installing anchors, they should be slightly recessed into the board surface, and the adhesive should be smooth and level with the board.
- Anchors should be at least 30mm from the edge of the board.
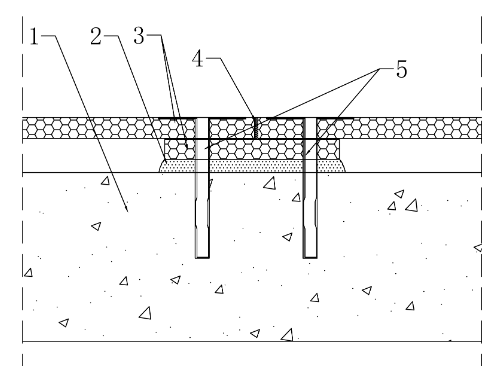
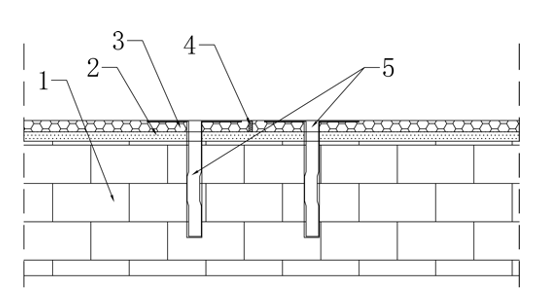
Mortar Point Adhesion Method, Error Margin 0-20mm
- Brick and mortar structure
- Mortar points for adhesion
- 20mm thick board, tile adhesive filled below joints, and sealing the edges with adhesive.
- Anchors corresponding to mortar points.
- Masonry wall
- Mortar points with tile adhesive
- Board
- A5 adhesive
- Anchor
Notes:
- Suitable for brick and mortar or concrete substrates with a flatness error of 0-20mm.
- The board used in this structure should have a minimum thickness of 20mm.
- Anchors should be no less than 5 per square meter, arranged in a staggered pattern.
- Anchors should extend at least 35mm into the load-bearing wall structure.
- When installing anchors, they should be slightly recessed into the board surface, and the adhesive should be smooth and level with the board.
- Anchors should be at least 30mm from the edge of the board.
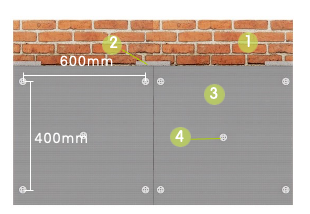
Spacer Block Adhesion Method, Error Margin 20mm or Less
- Brick and mortar structure
- Tile adhesive
- Spacer blocks
- A5 adhesive
- 20mm thick board, tile adhesive filled below joints, and sealing the edges with adhesive.
- Anchors corresponding to spacer blocks.
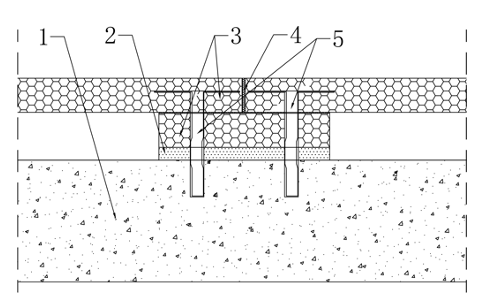
- Concrete base
- Tile adhesive
- Board
- A5 adhesive
- Anchor
Notes:
- Suitable for concrete-based substrates with a flatness error of 20mm or less.
- The board used in this structure should have a minimum thickness of 20mm.
- Anchors should be no less than 5 per square meter, arranged in a staggered pattern.
- Anchors should extend at least 35mm into the load-bearing wall structure.
- When installing anchors, they should be slightly recessed into the board surface, and the adhesive should be smooth and level with the board.
- Anchors should be at least 30mm from the edge of the board.
Concrete Structure Installation Steps
STEP 1. Substrate Treatment
Clean the substrate, apply tile adhesive/mortar/spacer blocks, and mark the anchors on the board surface.
STEP 2. Tile Backer Board Installation
Mechanically reinforce with anchors, seal joints with adhesive, and fill the gaps with tile adhesive.
STEP 3. Gap Treatment and Finish Installation
Refer to ” Gap Treatment Process” for final surface installation.
Concrete Floor Installation
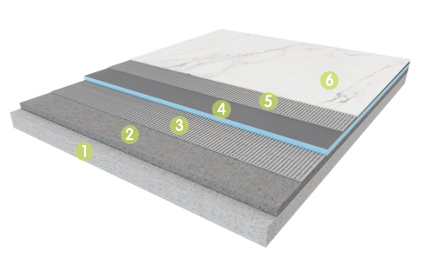
Key Components:
- Concrete base
- Dry mix mortar
- Tile adhesive
- Board
- Tile adhesive
- Floor tiles, marble, or other finish layers
- Concrete base
- Dry mix mortar
- Tile adhesive
- Board
- Tile adhesive
- Floor tiles, marble, or other finish layers
Notes:
- Suitable for uneven concrete floor substrates.
- The board in this structure should have a minimum thickness of 20mm.
Concrete Floor Installation Steps
STEP 1. Substrate Treatment
Clean the floor and level it with dry mix mortar. The leveled base should be smooth and solid.
STEP 2. Tile Backer Board Installation
Apply a thin layer of tile adhesive on the back of the board and install it.
STEP 3. Gap Treatment and Finish Installation
Refer to “Gap Treatment Process” for final surface installation.
Proper installation of base layers is essential for the long-term durability and stability of any construction project.
By following the steps outlined above, including substrate preparation, adhesive application, and gap treatment, you can ensure that your project is structurally sound and ready for finishing.
Whether working with the Dragon Bone System, structural panels, concrete floors, or brick concrete walls, these installation methods will help create a solid foundation for any surface treatment or finish you choose.
Feel free to reach out to us for more information, product inquiries, or to discuss how we can support your next project. Our expert team is here to assist with any questions you may have.
Contact us today to get started!
Talk to us today to discuss your requirements with one of our experienced and friendly team
