In construction and tiling projects, proper gap treatment is essential for maintaining a durable and waterproof surface, especially in areas exposed to moisture such as bathrooms and kitchens. This guide provides detailed instructions on how to treat gaps in both wet and dry areas using various materials and methods. By following these steps, you can ensure the longevity and stability of your finished surfaces.
Wet Area Gap Treatment
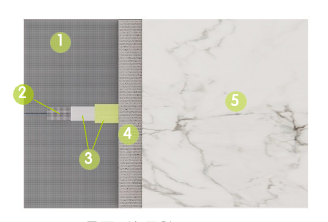
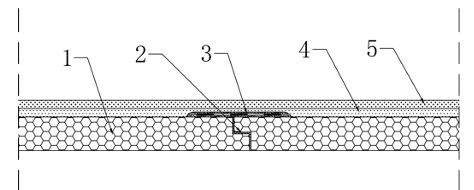
Method A: Using Adhesive
Board
Self-adhesive mesh fabric
A5 adhesive + waterproof rubber membrane
Thin tile adhesive (3-5mm)
Finish layer (tile, ceramic panels, stone, etc.)
Board
A5 adhesive, self-adhesive mesh
Waterproof rubber membrane
Tile adhesive
Tile or stone finishes
Notes:
Suitable for wet area gap treatment processes.
Method B: Using Waterproof Mortar
Board
Self-adhesive mesh fabric
Waterproof mortar
Leveling putty
Finish layer (tile, ceramic panels, stone, etc.)
Board
A5 adhesive (cut the extruded part after it dries)
Self-adhesive mesh, waterproof mortar
Leveling putty
Artistic paint or micro-cement as flexible finishes
Notes:
Suitable for wet area gap treatment processes.
Clean the gaps, squeeze out A5 adhesive, and after it dries, use a utility knife to trim it flush with the board.
Wet Area Gap Treatment Steps
Clean the joints and smooth out excess adhesive.
Apply self-adhesive mesh.
Apply adhesive and smooth it out with waterproof rubber membrane/ waterproof mortar.
Apply thin tile adhesive or leveling putty.
Finish with tile, ceramic panels, stone, or flexible finishes.
Dry Area Gap Treatment
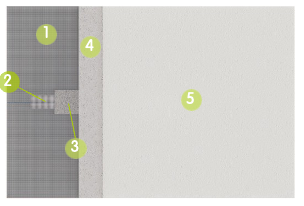
Method A: Using Adhesive
Board
Self-adhesive mesh fabric
A5 adhesive
Tile adhesive
Finish layer (tile, ceramic panels, stone, etc.)
Board
A5 adhesive, self-adhesive mesh
Tile adhesive
Tile or stone finishes
Notes:
Suitable for dry area gap treatment processes.
Method B: Using Waterproof Mortar
Board
Self-adhesive mesh fabric
Gap tile adhesive
Leveling putty
Artistic paint or micro-cement as flexible finishes
Board
A5 adhesive (cut the extruded part after it dries)
Self-adhesive mesh, tile adhesive
Leveling putty
Artistic paint or micro-cement as flexible finishes
Notes:
Suitable for dry area gap treatment processes.
Clean the gaps, squeeze out A5 adhesive, and after it dries, use a utility knife to trim it flush with the board.
Dry Area Gap Treatment Steps
Clean the joints and smooth out excess adhesive.
Apply self-adhesive mesh.
Apply adhesive and smooth it out with tile adhesive.
Apply thin tile adhesive or leveling putty.
Finish with tile, ceramic panels, stone, or flexible finishes.
Proper gap treatment ensures that your installation remains durable, water-resistant, and visually appealing. Whether you’re working in wet or dry areas, following the right process will ensure that your construction surfaces stand the test of time. By using high-quality adhesives, self-adhesive mesh, and waterproofing methods, you can achieve long-lasting results in both residential and commercial spaces.
Welcome to Contact Us!
If you have any questions or need further guidance on gap treatment techniques, our team is here to assist you. Whether it’s for residential or commercial projects, we provide expert advice and high-quality materials to help you achieve exceptional results.
Feel free to reach out to us today for inquiries, consultations, or support with your construction needs. We look forward to helping you bring your project to life!
Talk to us today to discuss your requirements with one of our experienced and friendly team